Deploy Spring Boot application to OpenShift 3 (next gen)
The tutorial will guide you through setting up a working instance of OpenShift deployment with your Spring Boot application.
Why OpenShift?
OpenShift is a stable hosting provider, branded by RedHat. There are 2 pricing plans — Starter and Pro. Starter is a free option and allows you to create 2 pods (Kubernetes’ containers) with 512 MB of RAM per each. It is a good solution to use it for tests and e.g. backend deployment for your brand new app.
There is unfortunately one painful limitation in Starter solution. Your resources have to hibernate for 18 hours in 72 h period of time. Resources are halted after 30 minutes of inactivity. Unexpected turn off can be dangerous for the application that has a long boot time. It would be good to control hibernation time. It can be done by pinging the system in given time period and not pinging in another e.g. at night. Of course it can be problematic if your application is international, in that case you probably should not use Starter option for deployment at all.

First steps in OpenShift 3 (next gen)
- Sign up to get an account.
- Choose server’s location.
- Open web console by clicking the button:

Then you see a list of projects that you maintain right now. You can add another project by clicking the button Create Project.

To create a project you need to give it a name, display name and the description.

After project’s creation and selection you see the whole panel for the project.

Let’s go briefly through all tabs. More detail description you find on the OpenShift Doc page.
- Overview — presents all applications you have added to the project.
- Applications — ready or working executable images of our applications.
- Builds — images of our application in preparation.
- Resources —information about quota, permissions, ssh certificates (aka secrets).
- Storage
- Monitoring — logs and metrics can be watched there.
Prepare Spring Boot app
To deploy Spring Boot application you need to have a compiled jar file.
As an example we can clone spring-boot-docker sample project. In the complete catalog you can start building the project.
cd complete
gradlew build
After the process In springBootDocker\complete\build\libs should be a file: gs-spring-boot-docker-0.1.0.jar. We need it to be able to deploy the app. You can check how does it work on your local machine by running it with command:
java -jar springBootDocker\complete\build\libs\gs-spring-boot-docker-0.1.0.jarIt should correctly boot the application and allow to see the welcome page on http://localhost:8080
Prepare Git repository for deployments
You need a git repository for deployment files because OpenShift will be building images for deployments based on the content in the git repository.
I assume you worked a lot on your application so that you would like to keep the code in jars private. This is why I propose you to create a private repository in bitbucket.
It is very easy to add read-only private access to bitbucket repository and use that access by OpenShift.

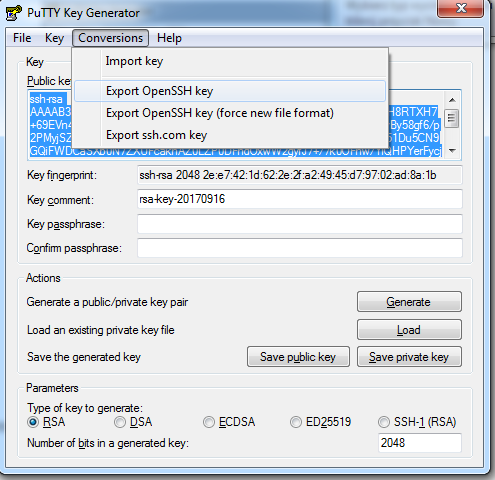
In settings of the repository you choose Access keys from GENERAL section. You can Add key by copy-pasting the public key from PuTTY Key Generator.


Remember to save private key and export OpenSSH key. Private key is important to be able to load the key to PuTTY Key Generator again. SSH key is essential to give OpenShift an access to your repository.
Push Spring Boot app jar to the git repository
Clone your git repository for deployments that you created on bitbucket. In the cloned repo directory, create tmp catalog and inside of it src directory.
git clone git@bitbucket.org:ownerOfYourRepository/your-app-deploy.gitcd your-app-deploy
mkdir tmp
cd tmp
mkdir src
cd src
Put the built jar file into tmp/src. You need to put it into this structure because OpenShift’s s2i builder (source to image builder) looks for executable files in it.
cp springBootDocker\complete\build\docker\target\gs-spring-boot-docker-0.1.0.jar your-app-deploy\tmp\srcCommit and push it into the remote repo.
Deploy Spring Boot app to the OpenShift 3 (next gen)
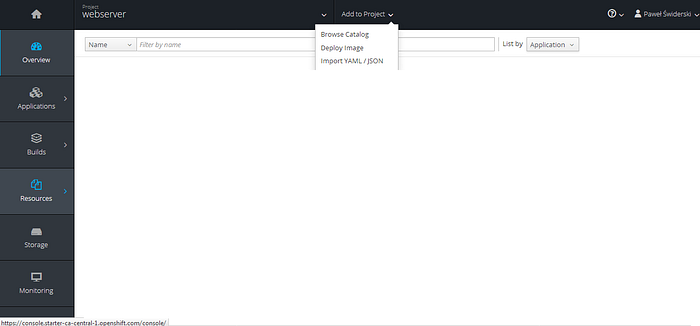
In the panel click Add to Project. It is located on the top of the page. Then choose Browse Catalog.
In the catalog you can choose the technology:

For our application choose Java.

Next thing you can choose is the type of container that your application will be holded in. Tomcat and WildFly are servers that can run Spring Boot application but they will add additional complexity by themselves. By the complexity I mean more memory and CPU consumption. They will wrap your app and proxy all calls.
Spring Boot app does not need any wrapper. It can run by its own thanks to the embedded tomcat.
The best solution for us is openjdk18-web-basic-s2i that you should select.
Next step requires filling a long form:

Don’t be overwhelmed. Some fields we’ll leave blank.
Fields that we need to take care:
- Application Name — put the name you want for your application
- Git Repository URL — copy-paste SSH address to your repository with deployments.
- Git Reference — leave it master if you pushed jar file on that branch.
- Context directory — location of the files in the repo. Write here “/”.

That’s it. Click Create at the bottom of the page.

It should end up with success. OpenShift informs you that you can use their CLI tool to make operations in their system. More about this is here. We will focus on managing through UI.
When we go to the Overview, our project should be visible:

At that moment, we would like to fetch our jar from the git repository, build image from it and deploy it to the configured application.
Go to Builds > Builds. Then there should be a position with our application spring-boot-blog-test. Click it.

In this panel we see built images from particular source code versions. Currently we do not have any builds. When you work with e.g. scripting programming language you can build images directly from the source code. In our case we do it from jars.
We would like to start build but it won’t be working right now because we did not configured authorization to our git repo that holds the jar file.
Go to Actions and select Edit.

Here you can configure git repository and image. Build from is a base image for our image to deploy. In our case it is openjdk-8 so basically Java 1.8. Push to is a configuration of files from git repository. webserver is an image namespace of Image Registry. That name is the same like the project’s.
Change version of build from from 1.0 to latest. We need the latest version of java 8.

Click advanced options for git repository. As you can see we did not choose Source Secret it means SSH certificate.

Click Create New Secret.
- Secret Name — is an ID of your certificate.
- Authentication Type — change to SSH Key
- Choose SSH Private Key — it has to be in exported OpenSSH format.

Create certificate and choose it as the Source Secret.

Save Build Config.
The build will automatically start:

The status will be updated when it will change. In the future you can Start Build by clicking the button. You can also configure hooks that will start build automatically when anything changes in the git repo.

Build #1 finished with success — it can be noticed by Complete status.
By clicking on hash and number of the bulid, in our case #1. You can see more details about build like logs, last commit description and more.

When the build is ready. Go to Applications > Deployments. Select the position with our application’s name spring-boot-blog-test.
Deployment #1 was deployed into 1 replica. Mind that deployment #1 does not have to be based on build #1. In this case they are related but does not have to be. The situation when they are not the same is for example when one of the builds fails.

Click deployment #1 to see more details about it.

As we see something went wrong. You can check in logs that:
Starting the Java application using /opt/run-java/run-java.sh ...
/opt/run-java/run-java.sh: line 44: cd: /home/jboss: Permission denied
It means that some environmental variables are not set properly. Actually we didn’t set them at all. Let’s do this.
Go back to deployment configuration for app. E.g. by going to Applications > Deployments > spring-boot-blog-test. And then select Environment tab.

Put values for JAVA_APP_DIR and JAVA_APP_JAR:
JAVA_APP_DIR: /deployments/tmp/src
JAVA_APP_JAR: /deployments/tmp/src/gs-spring-boot-docker-0.1.0.jar
Save variables.

New deployment starts automatically. If you would like to start deploy by hand you can do it by clicking Deploy button.
As we see deployment #2 is active. When we click on #2 and go to the details of the deployment we see that it is correctly deployed into 1 pod.

We can track logs and metrics:

When we go back to overview. We see our instance is working. It consumes in average 300 MB of memory, 0.09 KB/s of network and so on.

When we go to the link given in the panel then we see that it does actually work:

Summary
I hope you learned how to build and deploy Spring Boot applications into OpenShift 3 (next gen) platform. I also presented how to update the application and keep track on its logs and metrics.
If you have any questions or comments. Please let me know. Constructive feedback is appreciated.